

TL;DR:
- Building a necklace involves selecting beads, wire, clasps, and pendants to create personalized jewelry.
- Planning your layout with tools like a bead board ensures a neat, well-proportioned design before assembly.
Building your own necklace is defined as the process of selecting, arranging, and assembling beads, wire, clasps, and pendants into a finished piece of personalized jewelry. The industry term for this craft is “bead stringing” or “hand-strung jewelry,” and it requires no formal training to start. With the right tools and a clear plan, you can create a custom necklace design that reflects your style in under an afternoon. This guide covers everything from materials to assembly to troubleshooting, so your first project looks polished, not patched together.
What do you need to build your own necklace?
The foundation of any successful necklace project is the right set of tools. Three tools are non-negotiable: chain-nose pliers for gripping and bending wire, crimping pliers for securing clasps, and wire cutters for clean cuts. Without crimping pliers specifically, you risk flattening crimp beads unevenly, which causes clasps to fail.
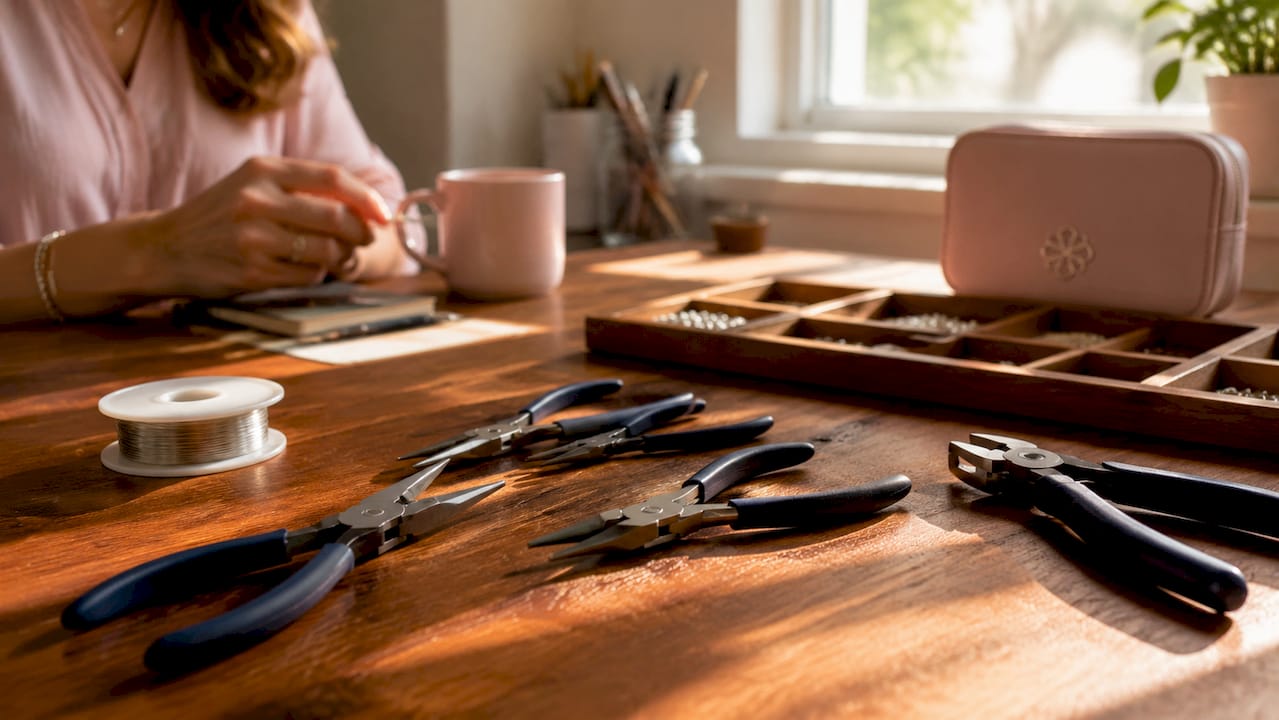
Your stringing material matters just as much as your tools. Nylon-coated steel wire is the professional standard because it combines flexibility with tensile strength. It drapes naturally around the neck and resists kinking. Fishing line and sewing thread are common beginner mistakes. Both stretch and snap over time, especially under the weight of heavier beads.
For findings, the small metal components that hold everything together, quality matters more than most beginners expect. Lobster clasps with finishing adhesive produce the most durable results. A findings starter kit is the most economical way to get clasps, crimp beads, and jump rings in one purchase. It removes the guesswork of buying components separately and keeps your first project budget-friendly.
| Tool or Material | Function |
|---|---|
| Chain-nose pliers | Gripping wire, opening jump rings, bending components |
| Crimping pliers | Compressing crimp beads in two stages for a secure hold |
| Wire cutters | Cutting nylon-coated wire cleanly without fraying |
| Nylon-coated steel wire | Stringing beads with strength, flexibility, and good drape |
| Lobster clasp | Fastening the necklace securely at the back |
| Crimp beads | Locking wire ends near the clasp |
| Jump rings | Connecting pendants, charms, or chain segments |
| Findings starter kit | All-in-one supply of clasps, crimps, and rings for beginners |
Pro Tip: Buy nylon-coated wire in 0.015-inch or 0.019-inch diameter for most bead sizes. Thinner wire works for seed beads; thicker wire handles heavier stone beads without sagging.
How do you plan your necklace layout before assembly?
Planning your layout before cutting a single inch of wire saves you from costly mistakes. A bead board is the standard tool for this stage. It has measured channels and curved grooves that let you arrange beads in the exact order and spacing you want before committing to wire. Think of it as a dress rehearsal for your necklace.
When planning your design, consider these four elements:
- Length: The standard necklace length is 18 inches, which sits near the collarbone and works for most necklines. Chokers run 14–16 inches; princess length runs 18–20 inches; matinee length runs 20–24 inches.
- Color palette: Limit yourself to two or three colors for your first project. A monochromatic palette with varied textures reads as intentional. Too many colors without a pattern reads as random.
- Bead sizing: Vary bead sizes to create visual rhythm. A common approach is placing larger focal beads at the center and graduating to smaller beads toward the clasp.
- Pendant placement: A single pendant works best centered on the strand. For multiple charms, space them at least half an inch apart to prevent tangling and crowding.
For multi-strand designs, adjust each strand 1–2 inches longer than the previous one. This keeps strands from overlapping and gives the finished piece a clean, layered look. If you want inspiration for how keepsake jewelry design incorporates meaningful elements, that principle applies directly to pendant and charm selection here.
Pro Tip: Photograph your bead board layout before you start stringing. If a bead rolls out of place mid-project, you have a reference to restore the original design.
Step-by-step instructions to assemble your necklace
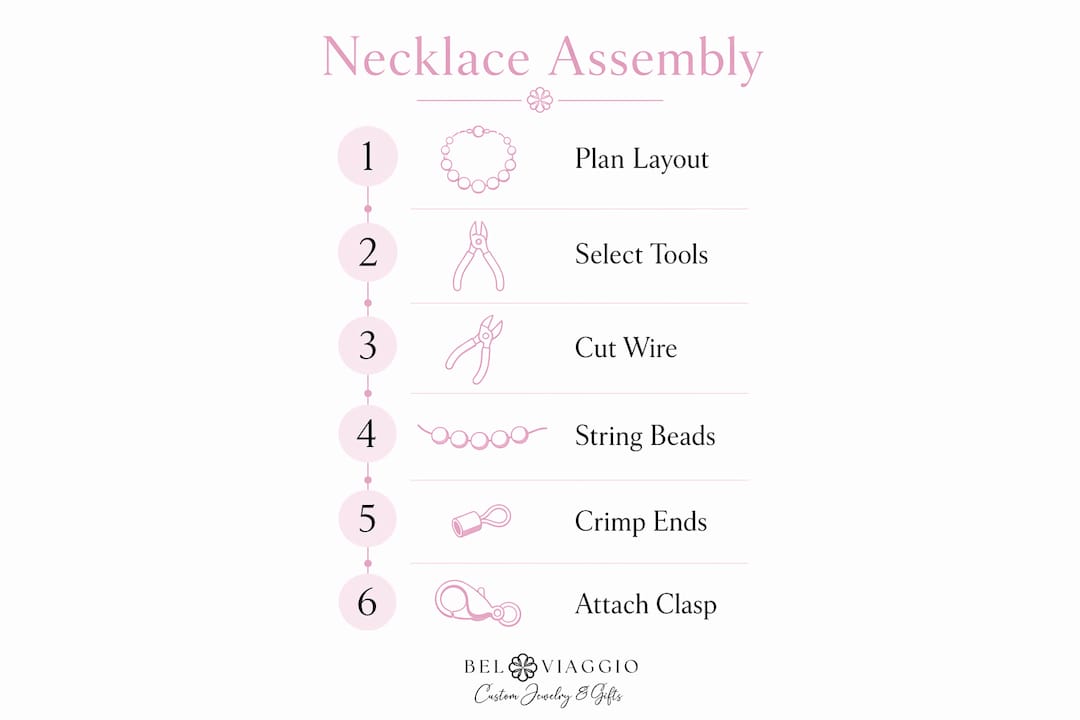
A beginner necklace project is a single-strand design with crimp beads and a lobster clasp. With your layout planned and tools ready, assembly follows a clear sequence. Experienced crafters complete this process in under 10 minutes once they know the steps.
-
Cut your wire. Add 3–4 inches to your target necklace length before cutting. That extra length gives you room to work the crimp beads and clasp at each end without pulling the design tight.
-
Thread the first crimp bead. Slide one crimp bead onto the wire, then pass the wire through the loop of your lobster clasp. Feed the wire tail back through the crimp bead, leaving a small loop around the clasp ring.
-
Compress the crimp bead. Place the crimp bead in the back notch of your crimping pliers and squeeze firmly. This folds the bead into a curved shape. Then move it to the front notch and squeeze again. This two-stage crimping technique locks the wire without cutting into it. A single squeeze in the wrong notch leaves the crimp loose or sharp-edged.
-
String your beads. Follow the order from your bead board layout. Thread both wire strands through the first few beads to hide the wire tail, then continue with the single strand for the rest of the design.
-
Attach the second clasp end. Slide a crimp bead onto the wire, pass it through the jump ring on your chain extender or clasp end, and feed the wire back through the crimp bead. Pull the wire snug so there is no visible gap, then crimp in two stages as before.
-
Add pendants or charms. Open jump rings by twisting sideways with two pliers, never by pulling the ends apart. Pulling distorts the ring’s shape permanently and weakens the metal. Slide the pendant onto the open ring, then twist it closed until the ends meet flush.
-
Trim excess wire. Use wire cutters to clip any remaining tail as close to the crimp bead as possible. A flush cut prevents sharp wire ends from scratching skin.
Pro Tip: Tuck the wire tail through at least two beads before trimming. This hides the end completely and adds a second point of tension so the crimp bead is not the only thing holding the design together.
For guidance on how custom jewelry design works at a professional level, the same principles of planning, precision, and quality materials apply whether you are stringing beads or commissioning a piece.
What mistakes should you avoid when building a necklace?
Most necklace failures trace back to a small number of repeatable errors. Knowing them in advance saves you from restarting a project halfway through.
-
Wrong stringing material. This is the most common beginner pitfall. Fishing line stretches under bead weight and snaps without warning. Sewing thread frays at crimp points. Nylon-coated steel wire is the correct choice for any necklace meant to last.
-
Single-stage crimping. Compressing a crimp bead only once leaves it oval-shaped and loose. The wire can pull free under normal wear. Always use both notches on your crimping pliers in sequence.
-
Prying jump rings open. Pulling the ends of a jump ring apart instead of twisting them sideways creates a gap that never closes flush. The pendant will eventually slide off. Two pliers, a sideways twist, and a firm close are the correct technique every time.
-
Poor bead-to-wire weight matching. Heavy beads on thin wire cause the necklace to hang stiffly or pull to one side. Match your wire diameter to your bead weight. Stone beads above 8mm generally need 0.019-inch wire or heavier.
-
Skipping the layout stage. Stringing beads directly from a bag without planning leads to uneven spacing and color clashes that are hard to fix once the wire is crimped. The bead board step is not optional for a clean result.
-
Ignoring clasp quality. A weak spring-ring clasp on a heavy necklace will open under tension. Lobster clasps hold more securely and are worth the small price difference. For creative inspiration on personalizing accessories beyond basics, a step-by-step guide to cork gifts shows how thoughtful material choices elevate any handmade project.
Patience is the skill that separates a frustrating first project from a satisfying one. Redo a crimp rather than leave it loose. Rearrange beads on the board rather than string them in the wrong order. The time you spend correcting at each stage costs far less than restarting from scratch.
Key Takeaways
Building your own necklace requires nylon-coated steel wire, proper crimping technique, and a planned bead layout to produce a durable, professional result.
| Point | Details |
|---|---|
| Use the right wire | Nylon-coated steel wire is the only stringing material that provides strength and natural drape. |
| Plan before you string | A bead board lets you arrange and photograph your layout before cutting any wire. |
| Crimp in two stages | Use both notches on crimping pliers to lock wire securely without damaging it. |
| Twist jump rings, never pull | Sideways twisting with two pliers preserves ring shape and prevents pendant loss. |
| Match wire weight to beads | Heavy beads need thicker wire; mismatched weight causes stiff hang and poor drape. |
Why handmade necklaces are worth every mistake
I have made a lot of necklaces that did not work out. A crimp that slipped. A color combination that looked great on the bead board and terrible on a neck. A pendant that kept sliding off because I pried the jump ring instead of twisting it. Every one of those failures taught me something a tutorial could not.
The thing most guides do not tell you is that your first three projects are not really about the finished piece. They are about building muscle memory for crimping, developing an eye for bead proportion, and learning which materials feel right in your hands. Once those instincts are in place, the actual making gets faster and more satisfying every time.
Material sourcing is where I see people underinvest. Buying the cheapest wire and the flimsiest clasps produces a necklace that breaks on the third wear. Spending a few dollars more on quality nylon-coated wire and a solid lobster clasp produces something you can wear for years. The difference in cost is small. The difference in result is not.
The most meaningful necklaces I have made were not the most technically complex. They were the ones where I chose beads for a reason: a color that matched someone’s eyes, a stone with a story, a charm that marked a specific moment. That intentionality is what separates a handmade piece from a purchased one. If you want to go deeper on how to build that kind of meaning into your designs, the Belviaggiodesigns guide on ethical design ideas is worth reading before you pick your next set of materials.
— Stacy
Quality chains and components from Belviaggiodesigns
When your DIY skills are ready for finer materials, the quality of your chain and findings makes a visible difference in the finished piece.
Belviaggiodesigns carries a curated selection of sterling silver and gold chains suited for both pendant necklaces and standalone wear. Options include the 1.5mm 14kt gold beaded chain and the 1.75mm diamond-cut cable chain, both available in standard lengths that pair well with custom pendants. For those who want a professionally finished piece rather than a DIY project, Belviaggiodesigns also offers fully custom handcrafted jewelry, including its gemstone ring collection for anyone ready to extend their personal style beyond necklaces.
FAQ
What wire is best for stringing a necklace?
Nylon-coated multi-strand stainless steel beading wire is the professional standard. It provides strength, flexibility, and natural drape that fishing line and sewing thread cannot match.
How long should a standard necklace be?
The standard everyday necklace length is 18 inches, which sits near the collarbone and suits most necklines. Choker lengths run 14–16 inches, and matinee lengths run 20–24 inches.
How do you close a crimp bead correctly?
Place the crimp bead in the back notch of crimping pliers and squeeze, then move it to the front notch and squeeze again. This two-stage process folds and locks the bead without cutting the wire.
How do you attach a pendant to a necklace?
Open the jump ring by twisting it sideways with two pliers, never by pulling the ends apart. Slide the pendant onto the ring, then twist it closed until both ends meet flush.
How long does it take to make a beginner necklace?
A single-strand beaded necklace with a clasp and crimp beads can be completed in under 10 minutes once you have your layout planned and your tools ready.
Recommended
- Custom Jewelry Guide: Meaning, Magic & Your Perfect Ring – Bel Viaggio Designs, LLC
- Design a Ring Online Free: Your Complete 2026 Guide – Bel Viaggio Designs, LLC
- Design Your Own Diamond Ring: a Personalized Guide – Bel Viaggio Designs, LLC
- How custom jewelry design works: a step-by-step guide – Bel Viaggio Designs, LLC